Project Panda Monium ,the twin engined starlet.(part 25 )

Hello again , or if your new, welcome 🙂

I have mounted the raised gear shift from last post, and it is remarkably solid , so much so that I may change it’s status to permanent with a little tidying up  , I have also cut the hole for the cable plate and tack welded it in. Below is a disassembled pic of that plate etc and below that the plate in place , I did think about machining out the back of the plate to save some weight but decided that the 50 or so grams I would have saved could better be sorted by more boost , because you know more boost solves most of life’s important questions in my opinion 😉 . P1030505

P1030514

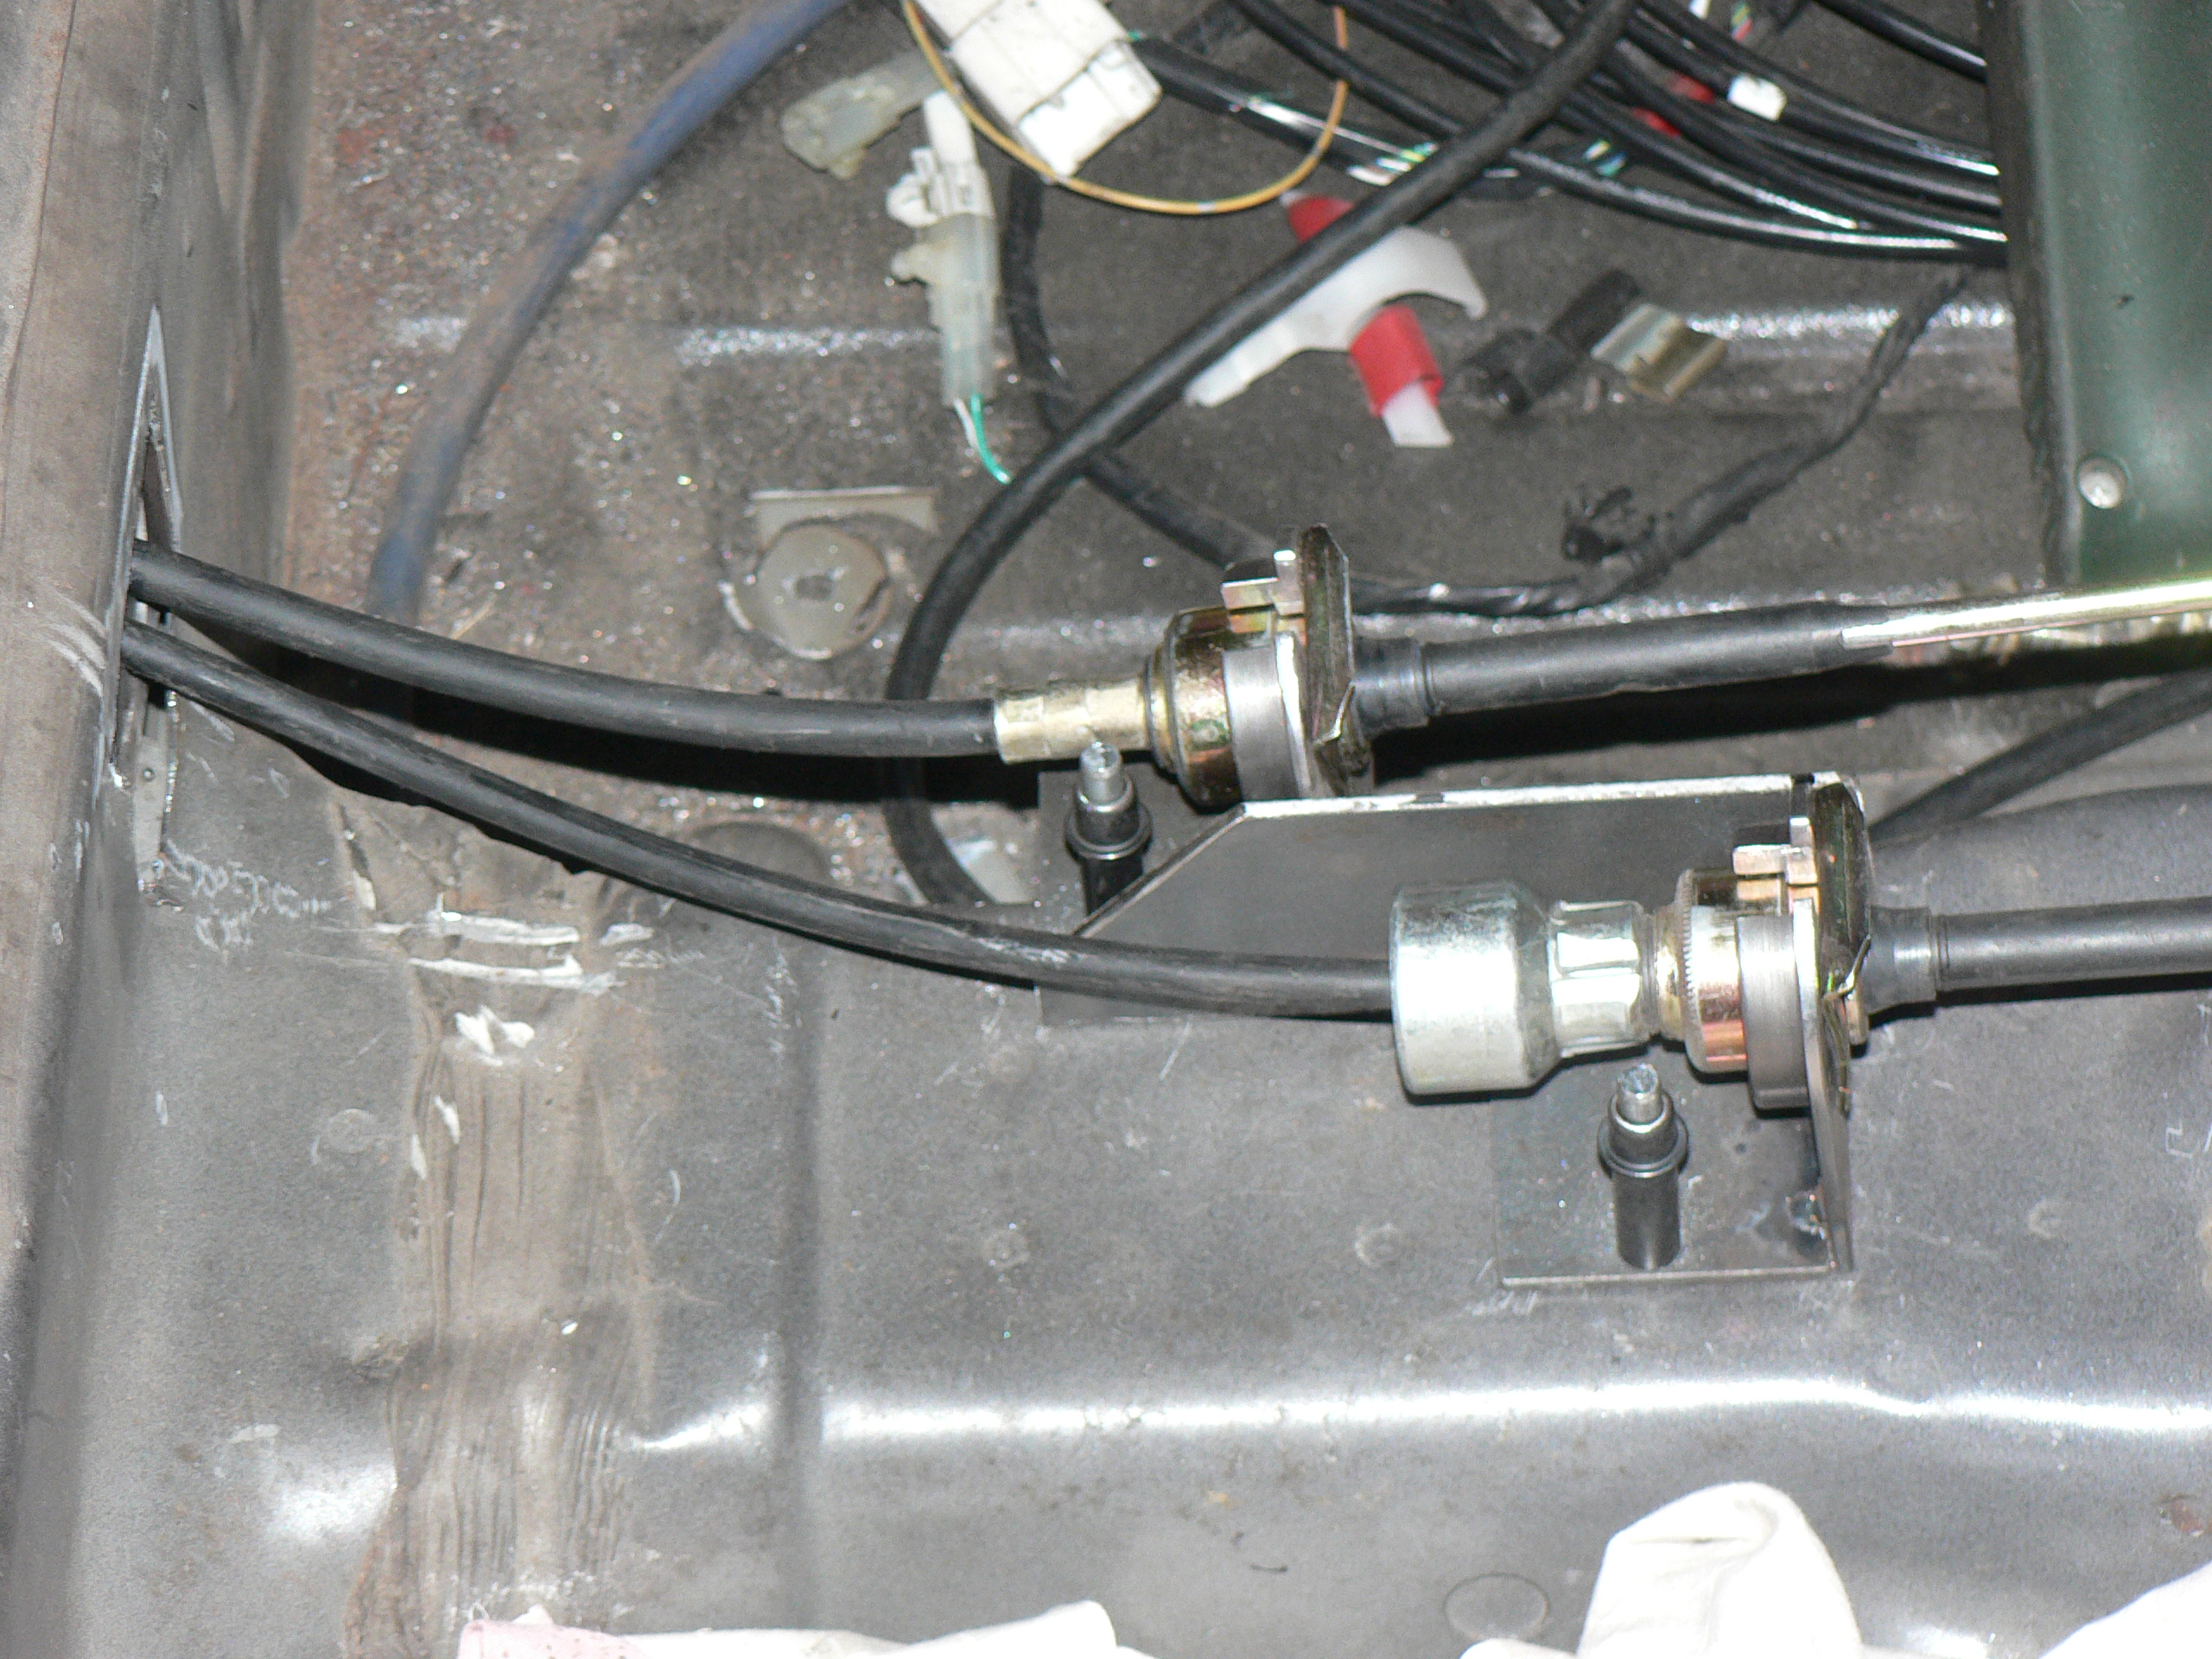
Once that was done I moved on to sorting out the inside stuff . First I made a bracket to hold the cables and used my new clecos  to hold it in place . You can see them in the below pic as the black things with a silver bit sticking out the top , for those who don’t know what they are , they are basically a removable rivet , you use a special set of pliers to open them and when you let the pliers off a strong spring inside them clamps the bits together . I am quite impressed so far  and I can think of lots of projects they will be useful for.

I am planing to use some 10mm tube I have to make the connecting rods from these cables to the gear shift as it is very strong for its weight , and I plan to fit a turnbuckle in each tube so I can adjust the shift point on the rear box to be the same as the front box .

P1030512


And next , here is a pic of a washing machine , why I can hear you ask , well I brought it for the sheet-metal it is made of to use for making the rear radiator box. The funny thing is that by the time I have sold the motor and control panel I will probably have made money as well as getting the steel I needed . 🙂

P1030501

Finally , I have been giving more thought to how to run the motors and at this stage I’m thinking of using a Link G1 v5 ECU for the front motor and swapping in the Link G4 from the race starlet for the rear motor initially till the project has proven it self worthwhile. I am hoping the G4 ecu will allow me to do a version of what the guys in the below video link did to their twin engined car , thou my budget is non existent compared to theirs.    Luckily I have Kiwi ingenuity to hopefully make up for it ha ha.

Z cars twin engined ultima

and in case you missed it due to living under a rock or such like here is a link to episode 7 of project Binky from the lads at Bad Obsession motorsport , such inspirational work , keep it up chaps.


Project Panda Monium ,the twin engined starlet.(part 24)


Since last update I have done some work on the water air intercooler , mainly planing where the hoses will run and where to mount the pump . I also sorted and fitted some rubber isolation mounts to the pump bracket.

I came to the conclusion that I need to sort out the ducts to the rear radiator box as the Intercooler water hoses need to be routed around the duct on the passenger side, hence needing to know exactly where they will be . After playing around with the duct on that side it became clear that there wasn’t really enough room for the duct I have, to get out without being somewhat squashed by the chassis rail . On the other side as in the pic below it is fine. So I have decided to make the duct as I first planed out of the foam I have and fiberglass over it.

P1030466

I remembered a You Tube video I saw were the guy used the fiberglass cast tape they use for broken arms etc and it looked like it would be a good way of doing it.

The tape is activated by soaking in water and you then have 7 to 10 minutes to work with it. I had a look for it on Ebay to see how available and expensive it was and ended up getting 10 rolls (3.6 meters each) for US$30 . i resisted the urge to go for red or blue and went with black 🙂 . I am looking forward to seeing how it works.cast tape

I also did some more work on the gear shifting on the rear box and trial fitted the cables to the box in the car which showed up something I hadn’t noticed on the box I first set it up on , that was that one of the cables was right up behind the clutch fork . this wasn’t a problem on the MR-S box as Toyota had put the fork down the side of the box but on the starlet box there it is bang in the way. After some thinking I decided that with a bit of modification I could rejig the bracket to give more clearance and below is how it came out , it should be enough as the cables sit a little more to the right when in place.


P1030494

I then made a plate to mount the factory rubber seal for the cables and made a hole thru the body above the tunnel , the plan is to cut a hole in the bodywork and weld this plate in.


Next I figured I needed to sort out how to attach the cables to the shift lever and as I have the gear shift lifted 100mm in the race car and like it , I figured I needed to do the same in the project car before I started making linkages etc , so here is what I have quickly knocked up so I can continue on working out how it will work.P1030499


and finally I have brought a washing machine on trade me for it’s panel steel to use making the radiator air box , there might even be other useful stuff I can salvage from it but for $10 it was cheap enough just for the steel .

I also read a new post in a series that is really informative and well worth the read , which has given me some more ideas about sorting the ” steering” arms at the back to remove the bump steer.

http://www.motoiq.com/MagazineArticles/ID/3608/The-Ultimate-Guide-to-Suspension-and-Handling-Bump-SteerToe-Steer.aspx

Till next time 🙂


Project Panda Monium ,the twin engined starlet.(part 23)

I don’t have any new pics  for you this time so I’ve found one of my inspiration car ,   and   underneath is a link to the article in speedhunters all about it. It’s monsters 95 pikes peak hillclimb car

Twin-Engine-Escudo-30

Monsters twin engine beast ( you may have to push Esc to be able to navigate around the site)

I haven’t done an update lately as I really haven’t done much on the project car for various reasons. One of those reasons was spending some time on the race car to get it ready for racing , First up was fitting the new tyres and making sure they had clearance on the bodywork. after some persuasion it all looked good (after the race there was almost no rubbing and no cuts so a win ) , I started fitting some flares but ran out of time ,but I’m pretty happy with how it’s going so far, and it should be good practice for the project car.

I have now done the sprint I was talking about last post and overall it went well , the tyres were awesome , but unfortunately the motor has gone off song which is a bit of a problem as it was out of , and meant to be going back in to , the project car . I also hurt my back pushing the car trailer on the day so am currently not able to go to the workshop to investigate the problem. I’m hoping to be on it in the next few days though.

I have managed to do some work on the gear shift cable bracket for the gearbox end so I now have that bolted to the box in the project car with the cables fitted. I have been thinking about how to get them into the car and how to connect them to a gear shift lever and I think I will take them thru the bodywork between the tunnel and the white painted panel in the middle of the green 4th engine mount area in the pic below. I’m thinking that I’ll do the 4th mount at the same time as they are both in the same area and need to play nice with each other 🙂 .

P1030415

One of the other things I’ve been contemplating is the gearboxes , I need to rebuild one for the rear using the MR-S case with the detent for the shift mechanism . The big question is , what type of box internals do I use, as I can go C52 with the starlet 3.7 diff , or C56 with the MR-S / corolla 4.3 diff . I already have a starlet box for the front of the project so doing the rear box the same means only one box to rebuild , but with the slower acceleration diff ratio and less close ratio gears .

The other option is to go C56 which has the better diff ratio and 3rd/4th and matches the gearbox in the race car that has the LSD fitted . The quandary is that at least at first I want to keep the race car complete so I can keep using it , the other point is that the race car with the 1500 race motor back in it may actually be better suited to the 3.7 diff as it has much more mid range torque .

Also the race car’s  box has a LSD in it and while I’m still racing it , it needs to stay , so i’m thinking of getting one for the project car which then brings me to which end to put it to get the best result.  It is basically another one of those unknowns as it probably depends on how the project handles which of course I won’t know till it’s going lol.

I have talked to some people about fiberglassing / carbonfibreing the radiator air box and at this stage I have decided to make it out of metal , or sign board, as I have too much other stuff to sort just to get the project going to spend a fair amount on something that would really only be a better looking thing . After the project has proven itself as worthwhile then I’ll make the air box out of carbonfibre 🙂

finally , here is a list of the jobs I want to get done in the near future ;

– finish the air box for the rear radiators out of sheet-metal or sign board                                 – make the ducts up to the rear windows , and make the rear windows with ducts etc.             – modify the rear hatch for air out , ie cut holes , make duct and mesh the holes to look sexy   – finish mounting the water air intercooler pump and run the hoses                                          – finish the gear change cable run , and fit to the gear shift lever                                                – make the 4th engine mount                                                                                                           – make the dump pipe for the rear motor                                                                                       – make the exhaust section that goes under the rear motor                                                         – get the radiators in/ out pipes modified / moved

So I’m thinking that little lot will keep me busy for a while , and I promise to have new pics next time  🙂 .